Author Archives: admin

4 ideas you should steal from interactive fiction

5 NOVEMBER 2013 BY CATHY MOORE

1. Put the backstory in links.

Here are a few fun stories from the wild world of interactive fiction. Try them out to see cool techniques you can steal for your training scenarios.

The most realistic scenarios are rich in detail, but lots of detail can mean lots of text on the screen. One way to lighten the load is to put the backstory in optional links.

In Remembered, by Chris Klimas, you explore links to learn more about the history of the characters. The more backstory you read, the richer your experience.

This technique could be used to add depth to the typical management scenario. For example, here’s a scene from a (fake) scenario.

Earlier today, Noah emailed you to ask for a 10-minute meeting. Now he’s arrived for the meeting and looks flustered.

“It’s Brian,” he says. “He’s always been a procrastinator, but now it’s affecting my ability to meet my deadlines. He was supposed to give me Phase 1 three days ago and and when I ask about it, he only says, ‘I just need another day.’”
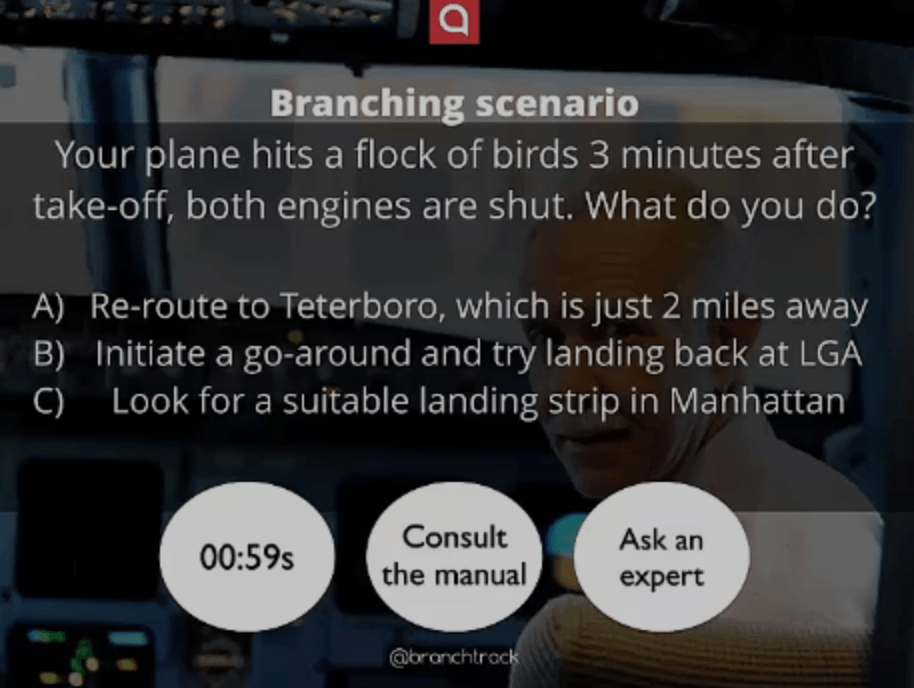
What do you do?

When you click “Noah,” you see this:

Noah transferred to your department 3 months ago, citing personality differences in his previous department. He’s reliable and does solid work.

He can look impatient in meetings, glancing often at his watch, and when someone offers a new idea, he’s likely to point out problems with it. He seems committed to meeting the unit’s goals and has proposed changes that improved efficiency. He’s the team lead for the project.

The link about Brian, a quiet man, points out that he recently asked to be moved away from a noisy coworker and has been looking tired.

This isn’t Dostoevsky, but the bits of backstory add more dimension to what could have been a generic management scenario with shallow, thought-free options. You get realistic details that make the decision more nuanced, but without feeling like you’re slogging through a novel.

2. Build the entire story on the screen.

Putting the backstory in links lightens the load, but it can make the story feel fragmented. Another approach is to build the entire narrative on one screen.

In The Play by Deirdra Kiai, you need to manage the egos and poor preparation of actors in a play. The result of each decision is added to the narrative on the screen rather than bringing you to another “slide.”

Bonus: As you play, keep an eye on the list of cast members on the right. It doubles as a record of their emotional states and your ability to manage them.

Having the final story appear all on one screen makes it far easier for the player to review it. This approach could be useful for longer scenarios about negotiation, difficult conversations, leadership, and other complex issues.

See the attribution box on the left of the story for a link to the tool used to create it.

3. Reconsider your belief that text is bad.

Did you suffer from the lack of images in the above two stories? Probably not.

Many scenarios that we create in training-land don’t really require visuals. Instead of spending an hour searching for non-awful stock photos of people talking on the phone, we could spend that hour making the story stronger.

4. Don’t leave the homestead.

The fake-translated-Russian story Small Child in Woods has an important lesson for us all.

A note about tools
“Remembered” and “Small Child in Woods” were created with Twine, a free tool that I explored in this post.
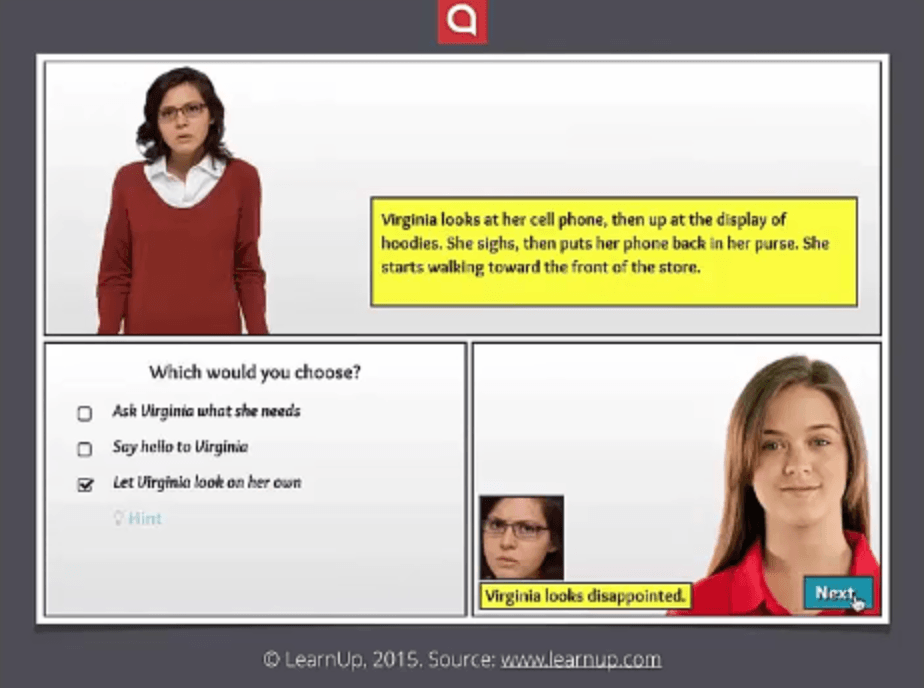
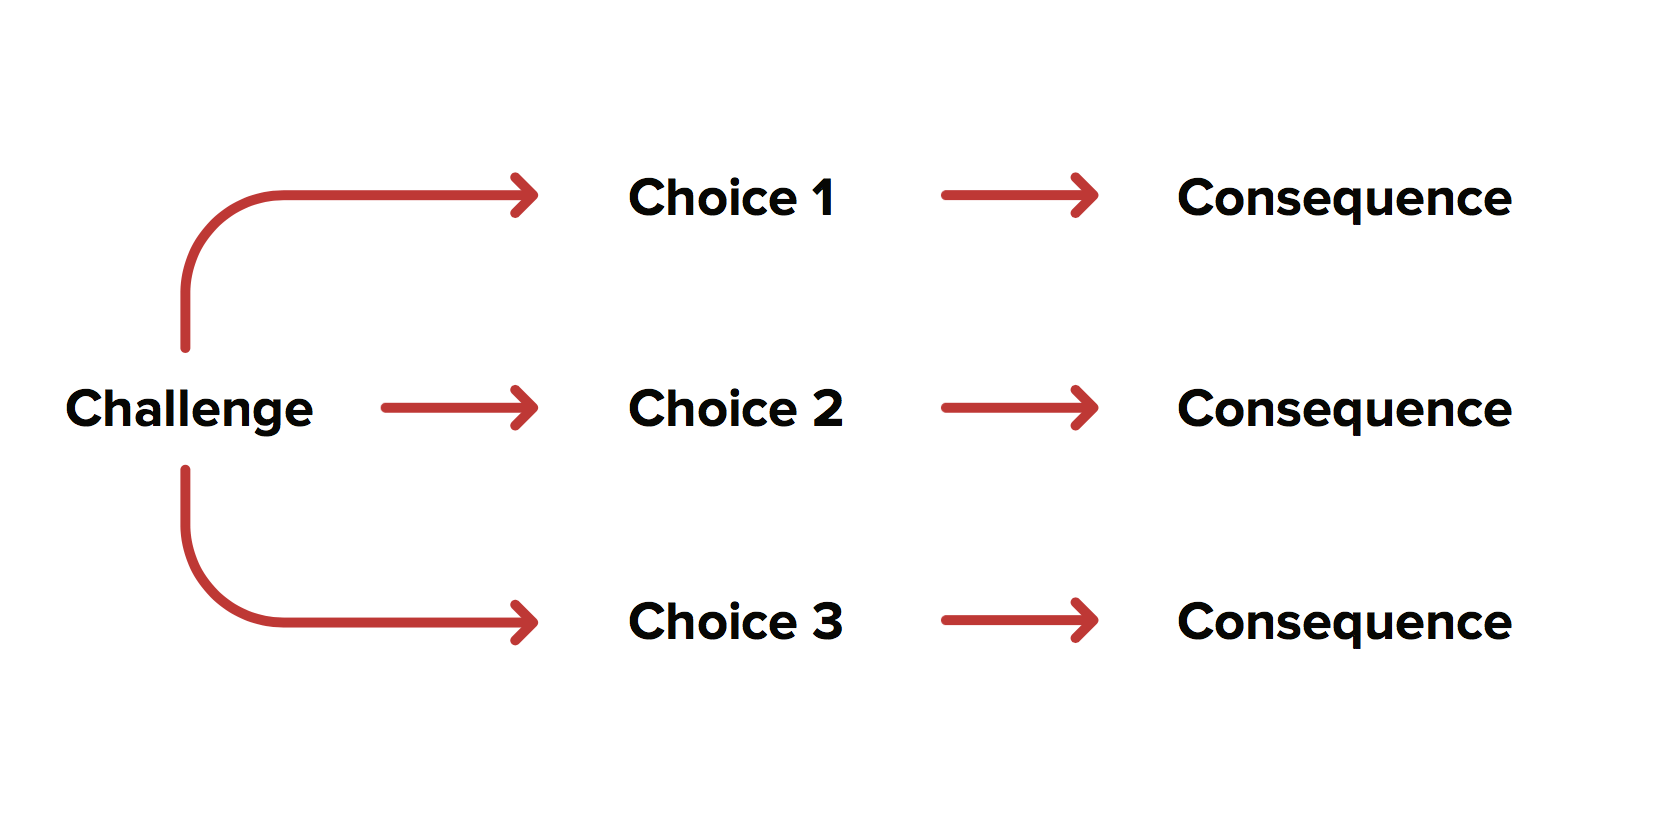
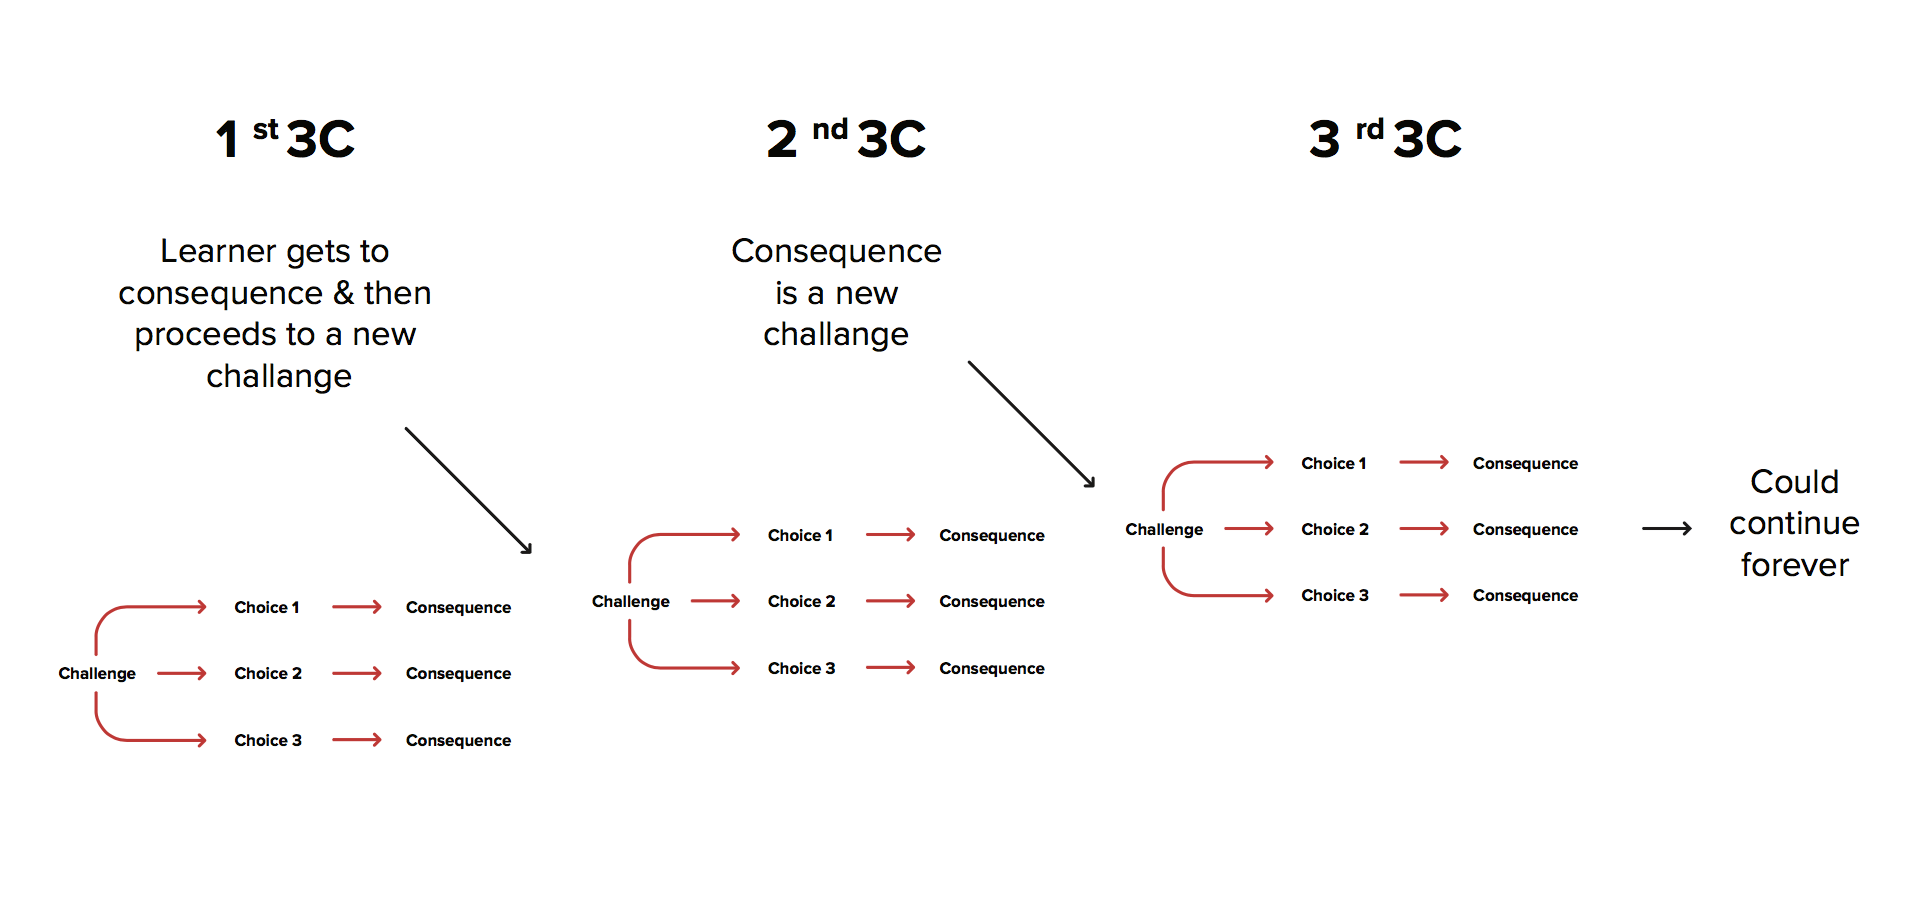
The Branching Scenario Method: Linear Vs. Non-Linear Branching Scenarios

https://elearningindustry.com/branching-scenario-method-linear-non-linear-branching-scenarios

Photo of Sergey Snegirev

A practical guide to creating learning scenarios: part 4

http://onlignment.com/2011/06/a-practical-guide-to-creating-learning-scenarios-part-4/

A practical guide to creating learning scenarios: part 4

Practical guidesIn part 1 of this series, we looked at what a learning scenario is, its basic structure, capabilities and applications. In part 2 we saw how simple scenarios could be used to help learners to undertake principle-based tasks. In part 3 we looked at how you could use simple scenarios to help learners to practise rule-based tasks. In this final part, we turn our attention to branching scenarios, which provide a more immersive approach to learning principle-based tasks. This builds on what we covered in part 2, so you might want to check back on that first. Our focus us here is on what it means for a scenario to be branching.

Why branching?

To understand the value of branching, you first need to understand how a scenario looks when it doesn’t branch:

Linear scenario

The diagram shows the learner being presented with a situation (S) and three choices. The learner is then immediately provided with feedback (F), related directly to the choice that they have made, pointing out positive aspects and correcting any misunderstandings or errors. All learners then proceed to the second stage of the scenario. Although the feedback can be considered to be branching, the overall path is linear.

While a linear scenario works well it many situations, it doesn’t resemble real life, where you get to experience the results of your decisions, for better or for worse.

With a branching scenario, it will be possible for different learners to progress along different routes through the scenario and to experience different end points. Where you arrive depends on the decisions you make along the way.

Branching scenario

The diagram shows only the initial two stages in the scenario – there could, of course, be many more. As you can imagine, if at every stage the scenario trebled in size (assuming three choices) it would soon become unmanageable. In practice, many branching scenarios return to a common narrative at key points or kick the learner out early if their initial choices represent fatal mistakes.

Providing the learner with feedback

Looking at the second flow chart above, you might wonder where all the feedback went! Well, first and foremost, feedback is implicit in the branching that occurs. If you shouted at the customer in situation 1, you’ll get your payback in situation 2.

Another way that feedback can be provided is with some sort of visual indicator, as the following examples show:

Extracts from Cathy Moore scenario
This scenario aims to help you make the transition from order taker to instructional designer and the meter at the bottom left gives you an update on your progress. On the right is an example of the feedback the scenario provides.

Thanks to Cathy Moore for this one. You might also be interested in the flowchart that Cathy created to help her design and test this scenario.

Extract from Montana scenario
This scenario, produced using the Rapid Intake tool, provides you with a traffic light indicator of how well you are doing as you progress through.
Extract from Montana scenario
At the end of the scenario, you are provided with detailed feedback on each one of your responses. You can then start again if you wish.

And thanks to Garin Hess at Rapid Intake for this example, which shows how comprehensive feedback can be provided at the end of the scenario.

Deciding on the look and feel

You can use any combination of still images, text, audio and video to present the situations in your scenarios, although the evidence is stacked against using text and speech simultaneously. Your decision is likely to be made on the basis of (1) how much realism is needed to adequately convey the situation, and (2) how much time and money you have got available to you.

Cathy Moore, along with her friends at Kinection, turned to a comic book approach for the acclaimed Haji Kamal scenario:

Extract from Haj Kamal
This scenario uses an eye-catching comic strip approach, achieved by converting photographs into illustrations. This extract is part of the scene setting.
Haj Kamal extract
Still using the comic strip approach, the learner is presented with a situation and a number of options for action.

Tools for developing branching scenarios

It is perfectly possible to build simple branching scenarios in PowerPoint and then convert to Flash using a tool that supports branching such as Articulate Presenter. General purpose desktop authoring tools, such as Adobe Captivate and Lectora, or online tools such as Rapid Intake’s Unison, have all the functionality you need. There is also talk of Articulate having a specialist scenario-building tool, called Storyline, in the pipeline for later in 2011.

Enjoy your story-telling.

A PDF version of this Practical Guide is now available.

Next up in the series is a Practical Guide to producing learning videos.

A practical guide to creating learning scenarios: part 3

http://onlignment.com/2011/06/a-practical-guide-to-creating-learning-scenarios-part-3/

A practical guide to creating learning scenarios: part 3

Practical guidesIn part 1 of this series, we looked at what a learning scenario is, its basic structure, capabilities and applications. In part 2 we saw how scenarios could be used to help learners to undertake principle-based tasks. In this third part we look in more detail at the steps involved in creating simple scenarios to help learners to practise rule-based tasks. Although scenarios are usually thought of as tools to support more complex problem-solving and decision-making, as we shall see, they can as easily be used as a technique for practising more routine, everyday tasks.

Rule-based tasks don’t require you to make judgements, just to follow instructions

When we talk about ‘rule-based tasks’ we mean those activities that can be carried out repeatedly according to clearly laid-out instructions. The job holder is not required to make a judgement, just to follow the rules – if this … do that. In the developed world, it would be fair to say that less and less tasks are of this nature, because routine tasks that obey strict rules can often be undertaken by robots or computers, transferred off-shore where the labour is cheaper or just looked up from some reference source as and when needed. Having said that, everybody’s job involves some rule-based elements, and some tasks simply can’t be carried out by a machine or at a distance.

Step 1: Teach the rules

Principle-based scenarios are typically used as an element in a process of guided discovery. The  scenario brings out issues which can then be reflected upon and discussed, hopefully resulting in learner insights. A task-based scenario is much more likely to be used within an instructional strategy – you teach the rules, then have the learner practise applying them in realistic situations.

So, before building the scenario, be clear about what the steps are in the procedure you want to teach and the rules that need to be applied at each step. Then create some content to get all this across:

  • provide an overview of the task and why it is important
  • demonstrate each step, explaining the rules that need to be applied and why these are necessary

Don’t over-teach. The idea is to provide the minimum information necessary for learners to be able to have a go themselves. The detail can be filled in later, either as feedback within the practise scenarios or as further reading.

Step 2: Develop a storyline

You can then set about designing your scenarios. The idea is to provide the learner with the most realistic experience of the task that you can. For more difficult tasks, start with a simple initial practice that will allow the learner to build their confidence by applying the most basic rules. Then move on to provide more difficult scenarios that require the learner to apply more complex rules. Aim to provide enough opportunities for practice that any learner will be able to gain confidence in applying the rules to real tasks.

You will not always be able  to provide completely  authentic practice opportunities. Sometimes your scenarios will be just a first step to be followed up by more realistic practice away from the computer.

Step 3: Develop your script

As with principle-based scenarios, use whatever media are necessary to convey the storyline. Text and images will often suffice, but if you need a more realistic experience, you have the option of richer media – perhaps even 3D graphics.

As ever, your hardest job will be to develop suitable questions. Where possible, these should match the real-life experience, so if the real task requires someone to type a code into a form field on a computer, then have them do the same thing in your scenario.

If you can, make the interaction match the task. Here the learner is required to complete a form field as they would in a real software application.
If you plan to use multiple-choice questions, then make sure that all the options are plausible

Ideally every option should have its own feedback. This allows you to correct any misundertandings that might have led to an incorrect answer and to add little details that you might have held back from your initial demonstration.

The feedback you provide can be used to correct any misunderstandings and to add extra detail

Step 4: Test and revise

As early as you can, have some sample learners try out your scenarios. Find out from them whether the scenarios are sufficiently realistic, whether they understand clearly what they have to do, whether the questions are set at the right level of difficulty, and whether the feedback is helpful. Be prepared to make lots of refinements until you get it right.

A practical guide to creating learning scenarios part 2

http://onlignment.com/2011/05/a-practical-guide-to-creating-learning-scenarios-part-2-simple-principle-based-tasks/

A practical guide to creating learning scenarios: part 2

Practical guidesIn part 1 of this series, we looked at what a learning scenario is, its basic structure, capabilities and applications. We move on now to look in more detail at the steps involved in creating simple scenarios to support learners in understanding the principles underlying everyday problem-solving and decision making. Scenarios are well suited to this type of learning problem, because they provide learners with the opportunity to experiment with different responses to the sorts of situations that they could encounter in their jobs and to gain insights into the dynamics which can determine success and failure.

Principle-based tasks require you to make judgements rather than simply follow rules

When we talk about ‘principle-based tasks’ we mean those jobs that cannot be accomplished by following simple rules – ‘if this happens then do that’. Principle-based tasks require you to make judgements on the basis of the particular situation you happen to be facing. They require you to understand cause and effect relationships, i.e. principles:

  • Projects with unclear objectives are more likely to fail.
  • Irritable behaviour can be caused by lack of sleep.
  • You’ll find it easier to cope if you don’t look at each email as soon as it comes in.
  • An impolite greeting will turn the customer against you before you’ve begun.

Principles such as these are relevant to just about any job you can imagine, although clearly some more than others. They are rarely black and white – in fact they are often the subject of differing opinion. Principle-based tasks, therefore, require a very different treatment and this is where scenarios come into their own.

Step 1: Decide what principles you want to bring out through the  scenario

A scenario needs a clear purpose – don’t use it just to lighten up what would otherwise be a boring piece of e-learning.  Be realistic about what you can achieve in one scenario. You may be able to tackle a simple principle with a single question, but often a whole series of questions will be required to bring out all the elements and to compare different perspectives. A lot depends on your learner. Novices will want to look at a single issue at a time, whereas more experienced practitioners may feel comfortable immersing themselves in a complex situation with all sorts of competing pressures. If in doubt, keep it short and simple.

Step 2: Develop a storyline

Your next task is to develop a storyline that will bring out the principles you have chosen to focus on. It is really important that this storyline is credible with your audience. They must be able to relate to the situation and the characters. If you are struggling for ideas, ask a sample of your potential learners to describe the situations they face in their own day-to-day work. As with TV drama, be careful not to base your plot too closely on a real-life incident in case you reveal the identity of the protagonists.

The problems that you set should be challenging yet achievable. Remember that what is challenging for a beginner may be completely obvious to an old hand, so adapt your scenario to your audience. With beginners, it’s a good idea to start with relatively straightforward and routine problems, and move gradually to the more complex cases in which right and wrong is not so easy to establish.

Step 3: Develop your script

Use whatever media are necessary to convey the storyline. More often than not text will do the trick, but some situations will be hard to get across without richer media.

You can use any media to describe the situation, but text and graphics will often suffice
This scenario is presented as a dialogue shown as a series of pictures with speech bubbles

Without doubt, your hardest job will be to develop plausible options for your questions. Every option should be tempting to at least a minority of your target audience. Throwaway options, which are clearly not going to work, will devalue the whole process.

Each of the options you present needs to be plausible, at least to a minority of your target audience

Assuming this is not a branching scenario (and we’ll be dealing with these later in the series), every option should have its own feedback. Writing this feedback will not be as simple as “Correct – well done” or “Sorry, incorrect.” Every answer deserves a considered response, weighing up all the pros and cons. If the feedback won’t fit on the same screen as the question, jump to a new screen where you have more room. Remember that this feedback will be the primary source of new learning, so it shouldn’t be wasted.

Again, assuming you are not creating a branching scenario, you should allow the learner to explore any and all of the options before moving on. A scenario is not an assessment, so don’t follow assessment rules.

Each option here has its own feedback, written to bring out the pros and cons of the learner’s choice. Learners are free to select as many options as they like.

Step 4: Test and revise then do it again

You’ve probably got the message by now that a scenario needs to be authentic. The only way you will tell whether you’ve got this right is to try it out with typical learners. Bring them in early. Have them provide a verbal commentary to you as they attempt the questions. Act on their feedback and then test again. You are not admitting a mistake by changing your script – you are showing how much you want to make it work.